Launch Your Static Website on AWS S3: A Beginner's Guide to High Availability and CDN

The Mission
Imagine you've just come up with an incredible idea for a project. You're excited, you're motivated, and you can't wait to share it with the world. But there's a catch - your budget is tight.
Don't worry, we've got you covered! You can create a stunning static website to showcase your idea without breaking the bank.
In today's digital landscape, Wordpress often takes the spotlight with its extensive features and plugins. However, it relies heavily on PHP to generate content on the fly, which can slow down your page load times. Plus, you'll need a webserver to host it, which can be a bit pricey.
Enter the world of static website hosting. With a static website, your content is
ready to go as soon as your page is requested, leading to faster load times and a
smoother user experience.
And the best part? You can host your static website on an S3 bucket AWS, an
affordable object storage solution that can hold your HTML, CSS, JS files, and even
media assets like images and videos. Combine your S3 bucket AWS with Cloudfront, a
top-notch CDN, and you've got the perfect setup for your static website.
Getting Started
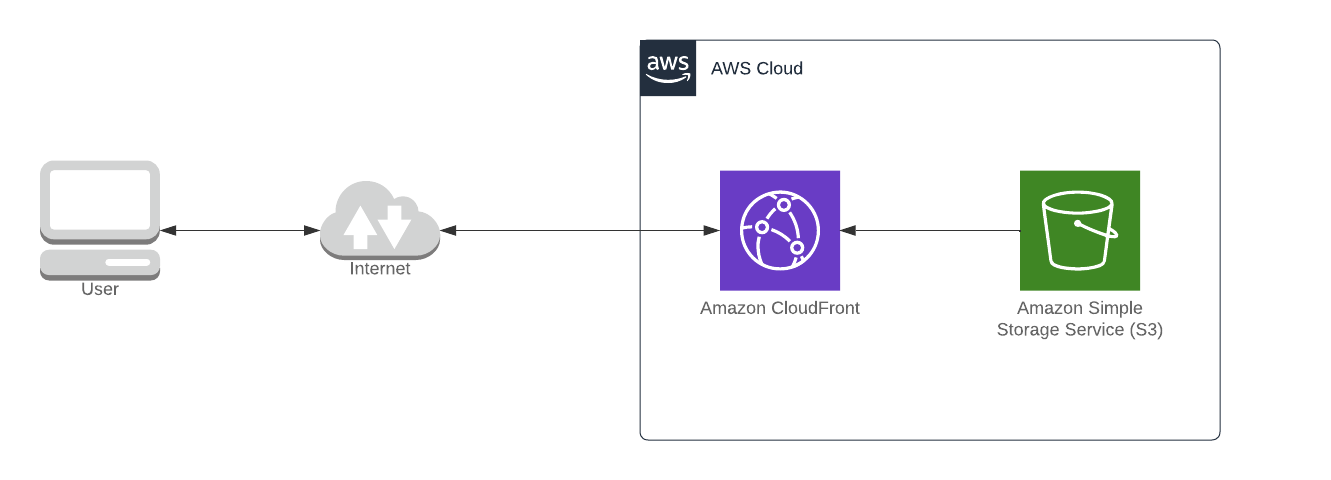
Setting up your infrastructure might sound daunting, but it's actually quite straightforward. All you need is Cloudfront and an S3 bucket AWS. To make things even easier, we'll automate the infrastructure deployment using Terraform. We'll also implement basic security checks on the Terraform code with Trivy as part of a pre-commit set of hooks. This way, you can focus on bringing your awesome idea to life while we handle the technicalities.
The proposed setup is this one:
Install Terraform
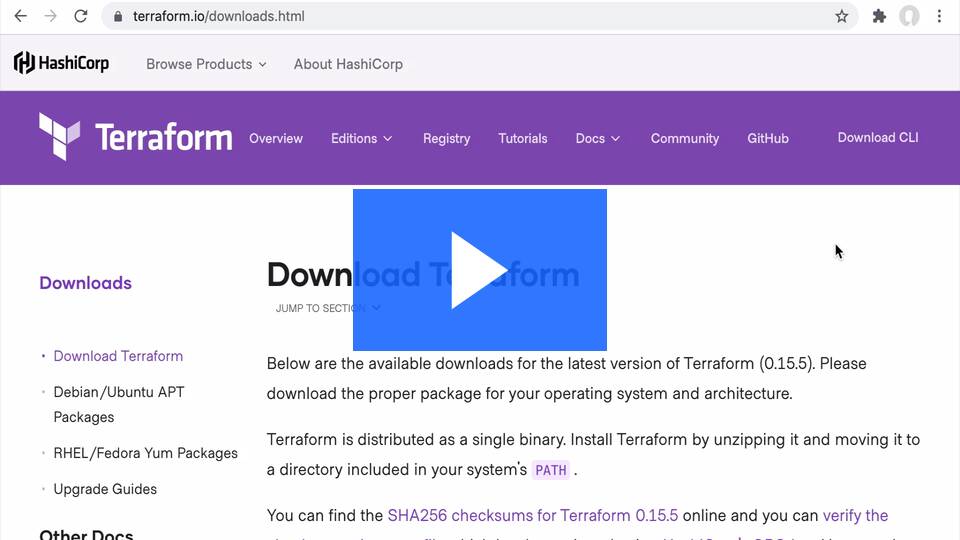
If you don't have installed Terraform on your machin follow this excellent tutorial provided by Hashicorp. Once you have it up and running you can follow with the next step
Connect to AWS
First things first! Lets get the AWS access key for your user following the
instructions in
this page.
Keep those keys PRIVATE. Don't upload it to git or other public
repositories where it could be exposed beucase that would allow others to access
your account.
If that happens please regenerate the tokens immediately!
Ok, let's write our first file versions.tf. Here we will define the version of terraform and AWS providers we're going to use:
terraform {
   required_version = "~>1.8.3"

   required_providers {
      aws = {
         source  = "hashicorp/aws"
         version = "~> 5.50"
      }
   }
}
Here we tell Terraform to use the version 1.8.3 for Terraform, and 5.50 for AWS provider
The next step is to write variables.tf file. This block of code will allow us to adapt the project to our needs:
variable "aws_access_key" {
   type        = string
   description = "AWS access key"
   sensitive   = true
   }

   variable "aws_secret_key" {
   type        = string
   description = "AWS secret key"
   sensitive   = true
   }

   variable "aws_region" {
   type        = string
   description = "AWS region"
   default     = "us-east-1"
   }

   variable "stack" {
   type        = string
   description = "defines the stack to deploy"
   }
- aws_access_key
- It's the user access key obtained previously
- aws_secret_key
- The secret key of the access obtained previously
- aws_region
- The AWS region where we want to deploy the site. Default to us-east-1 (Virginia US)
The last step to connect Terraform to AWS is to configure the AWS provider using the code written previously. Let's write the providers.tf
provider "aws" {
   access_key = var.aws_access_key
   secret_key = var.aws_secret_key
   region     = var.aws_region

   default_tags {
      tags = {
         Stack = var.stack
      }
   }
}
This is the minimum required code to make our installation work and connect to AWS.
If everything is correct you should be able to initialize your terraform project and do a first plan by running the command:
terraform init
It should show you something like:

Create the S3 bucket and configure it to host an static website
This part is a little bit longer because it requires the creation of several resources:
#S3 encryption is not required due the data on this bucket is publicly accessible
# tfsec:ignore:avd-aws-0088 tfsec:ignore:avd-aws-0089 tfsec:ignore:avd-aws-0090 tfsec:ignore:avd-aws-0132 tfsec:ignore:avd-aws-0320
resource "aws_s3_bucket" "website_bucket" {
   bucket = local.bucket_name
}
resource "aws_s3_bucket_public_access_block" "website_bucket_acl" {
   bucket                  = aws_s3_bucket.website_bucket.id
   block_public_acls       = true
   block_public_policy     = true
   ignore_public_acls      = true
   restrict_public_buckets = true
}

resource "aws_s3_bucket_website_configuration" "website_bucket_website_configuration" {
   bucket = aws_s3_bucket.website_bucket.bucket

   index_document {
      suffix = "index.html"
   }

   error_document {
      key = "index.html"
   }
}

data "aws_iam_policy_document" "website_bucket_policy_document" {
   statement {
      sid    = "AllowCloudFrontServicePrincipal"
      effect = "Allow"
      principals {
      type        = "Service"
      identifiers = ["cloudfront.amazonaws.com"]
      }
      actions   = ["s3:GetObject"]
      resources = [aws_s3_bucket.website_bucket.arn, "${aws_s3_bucket.website_bucket.arn}/*"]
      condition {
      test     = "StringEquals"
      variable = "AWS:SourceArn"
      values   = [aws_cloudfront_distribution.this.arn]
      }
   }
   statement {
      sid    = "AllowCloudFrontOriginAccessIdentity"
      effect = "Allow"
      principals {
      type        = "AWS"
      identifiers = [aws_cloudfront_origin_access_identity.origin_access_identity.iam_arn]
      }
      actions   = ["s3:GetObject"]
      resources = [aws_s3_bucket.website_bucket.arn, "${aws_s3_bucket.website_bucket.arn}/*"]
   }
}
resource "aws_s3_bucket_policy" "website_bucket_policy" {
   bucket = aws_s3_bucket.website_bucket.id
   policy = data.aws_iam_policy_document.website_bucket_policy_document.json
}


/*UPLOADING EXAMPLE WEBSITE*/
# this is not the ideal way to deploy code into S3. This was created to show how the static site will work
resource "aws_s3_object" "dist" {
   for_each     = fileset("./example-website-code", "**")
   bucket       = aws_s3_bucket.website_bucket.id
   key          = each.value
   source       = "./example-website-code/${each.value}"
   content_type = lookup(local.content_type_map, reverse(split(".", "./example-website-code/${each.value}"))[0], "text/html")
   # update files when they changes
   etag = filemd5("./example-website-code/${each.value}")
}
- aws_s3_bucket
- This terraform resource will create the bucket that will server our static website
- aws_s3_bucket_public_access_block
- Here we're going to define basic security policies to prevent the bucket's content is exposed directly to internet. We will be using a CDN for that puprose
- aws_s3_bucket_website_configuration
- In this resource we tell AWS that the content of the S3 bucket is a website, and the entry point is index.html. And the error is the same page (later you can create an specific page for that)
- aws_iam_policy_document
- In this data block we're going to define the S3 bucket policy to allow access to Cloudfront to pull the files to its cache servers
- aws_s3_bucket_policy
- This assigns the data we created previously to our S3 bucket
- aws_s3_object
-
Here we upload the html site to the S3 bucket. This is not the best approach
to deploy the static website, in a future tutorial we will explain how to
deploy the site using a CI/CD pipeline.
The basic opperation here is to recursively iterate on the folder example-website-code to upload each file specifying its content type.
The file
locals.tf
has other variables that won't be changed to often.
It defines the bucket name and creates a map that is used by
aws_s3_object to set the right content content_type:
locals {
   content_type_map = {
      "js"   = "application/json"
      "html" = "text/html"
      "css"  = "text/css"
   }
   bucket_name = "my-site.stoneitcloud.com"
}
The functioning of the map is self explainatory. When terraform finds a file ending on js it assigns the content type application/json, when it finds a file with extension html it assings the content type text/html, and for css files it assings the content type text/css
You can add other extensions and content type declaration to cover the case of images, videos and other assets.
Setting up the CDN with Cloudfront
AWS CloudFront is a Content Delivery Network (CDN) service provided by Amazon Web Services. A CDN is a globally distributed network of servers that helps deliver content to users with high performance and low latency.
When a user requests content from a website or application, the CDN serves the content from the server that is geographically closest to the user. This reduces the distance the content needs to travel, resulting in faster load times and improved user experience.
CDNs like AWS CloudFront work by caching content in multiple edge locations around the world. These edge locations act as points of presence (PoPs) and store copies of the content. When a user requests the content, the CDN routes the request to the nearest edge location, which then delivers the cached content to the user.
By using AWS CloudFront, content providers can ensure that their content is delivered quickly and reliably to users around the world, regardless of their geographical location.
Let's create the Cloudfront distribution by creating the file cloudfront.tf:
resource "aws_cloudfront_origin_access_identity" "origin_access_identity" {
   comment = "OAI for ${local.bucket_name}"
}

# cloudwatch logging and WAF are not required for this example
# tfsec:ignore:avd-aws-0010 tfsec:ignore:avd-aws-0011
resource "aws_cloudfront_distribution" "this" {
   origin {
      domain_name = aws_s3_bucket.website_bucket.bucket_regional_domain_name
      origin_id   = aws_s3_bucket.website_bucket.arn

      s3_origin_config {
         origin_access_identity = aws_cloudfront_origin_access_identity.origin_access_identity.cloudfront_access_identity_path
      }

   }

   enabled             = true
   is_ipv6_enabled     = true
   comment             = "Cloudfront distribution for ${local.bucket_name}"
   default_root_object = "index.html"

   default_cache_behavior {
      allowed_methods        = ["GET", "HEAD"]
      cached_methods         = ["GET", "HEAD"]
      target_origin_id       = aws_s3_bucket.website_bucket.arn
      viewer_protocol_policy = "redirect-to-https"

      forwarded_values {
         query_string = false
         cookies {
         forward = "none"
         }
      }
   }

   price_class = "PriceClass_200"
   viewer_certificate {
      cloudfront_default_certificate = true
   }


   restrictions {
      geo_restriction {
         restriction_type = "none"
      }
   }
}
- aws_cloudfront_origin_access_identity
- The aws_cloudfront_origin_access_identity is a resource in AWS CloudFront that represents an origin access identity (OAI). An origin access identity is a special CloudFront user that you can associate with your CloudFront distribution to restrict access to your Amazon S3 bucket or custom origin.
- aws_cloudfront_distribution
-
The aws_cloudfront_distribution is a resource in Terraform that
allows you to manage an Amazon CloudFront distribution. Amazon CloudFront is
a content delivery network (CDN) that securely delivers data, videos,
applications, and APIs to your viewers with low latency and high transfer
speeds.
We configure the following elements:- origin
- In this section we define our previouslu created S3 bucket as backend of this CDN
- default_root_object
- It specifies the object that you want CloudFront to return when a user requests the root URL of your distribution. In this case index.html
- default_cache_behavior
- here we configure the CDN to redirect http traffic to https, don't forward cookies or query strings, and only accept the GET and HEAD http methods
- price_class
- In our configuration we use PriceClass_200 which serves your objects from edge locations in all regions except South America and Australia. This is a mid-tier price point.
- geo_restriction
- This helps to define what region are allowed to access our site. In this case we don't restrict access
Now we have all our resources set, it's time to set the intput variables set on the file terraform.tfvars:
aws_access_key = ""

aws_secret_key = ""

aws_region = ""

stack = ""
Now let's run a plan to verify what resources will be created by our code
terraform plan -out plan.tfplanYou should see an output similar to this one:

Now, if everything went well we can apply the plan we run before (be patient because the CDN creation might take a couple of minutes):
terraform apply plan.tfplanAnd the output should looks like this one:
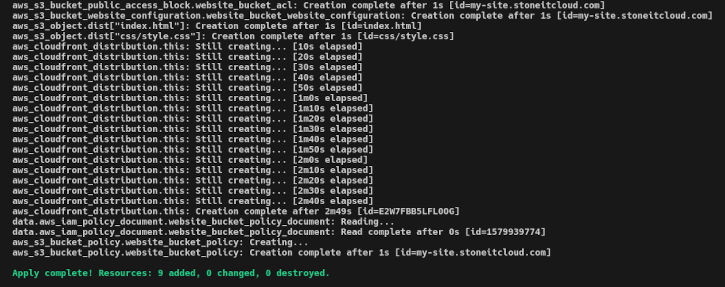
That's all! You have your static site running on AWS with S3 and Cloudfront!
If for some strange reason you want to destroy all this infrastructure, you could do it with
terraform destroybut we promise you don't want to delete this site! Let's see what costs says...
Cost calculations
This is the most interesting part.
How much a static website on AWS S3 costs?
The monthly infrastructure costs were calculated having the following data as example:
- Bucket size: ~1343Mb
- Average page size: 1376.2Kb
- Number of pages: 1000
- Average requests per month: 50000
- Region: us-east-1
- Regions that consume the website: US, Europe, South America
With the data provided above, we can obtain an estimation similar to this one: AWS Cost Estimation
An approximate cost of $2.88 per year!!
This does not include the services:
- Web Application Firewall (WAF): as it's a static site, the application does not require any protection because the content is static. Eventually, it could be enabled to mitigate DDoS attacks.
- Cloudwatch: site access logging is not required. You can use more interesting tools to have access information like Google Analytics.
- KMS: the S3 bucket does not require encryption because all information in the bucket is public.
- S3 Versioning: S3 versioning is disabled because the evolution of changes on the website could be stored on a source control management like GitHub, and the content deployment could be automatically conducted by a CI/CD tool.
Conclusion
Hosting a static website on AWS S3 is an affordable and efficient way to share your ideas with the world. By combining S3 with CloudFront, you can create a high availability setup that delivers your content quickly and reliably to users around the globe.
With Terraform, you can automate the deployment of your infrastructure, making it easy to manage and scale as your project grows. And with Trivy, you can ensure that your code is secure and free from vulnerabilities before it goes live.
So what are you waiting for? Get started today and launch your static website on AWS S3. Your audience is waiting!